
WONKO’S MICRODOT EXPERIMENTS
OK, for some reason I am getting into some of the weirder aspects of this photography stuff. I never could do anything normal. I saw a show where they were imbedding a microdot in a document. Can’t imagine why, but my mind started racing. I began to formulate a plan that depends on my ignorance of the facts to play out.
THE PLAN
Here it goes:
- I want to print a microdot that contains at least one paragraph of text.
- I must use either very cheap and widely available equipment, or stuff I already have.
- It must be able to be done with a minimum of processing.
- The technique must be fairly consistent and easily reproducible.
I remembered a discussion about the 100x handheld microscopes at Radio Shack in The Sub Club, I picked one up for about $13. I have a copy stand and a binocular attachment. I have a Minox B and a clockwork shutter release. I have some Kodak 2484 B&W film. I am dumb enough to try this.
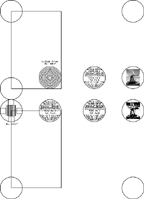
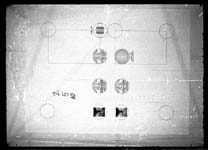
With that in mind, I planned to create a test page with scales, lines, text, and circles, printed on my 600dpi printer on an 8.5×11 inch sheet of paper. I would photograph this using the copy stand and my Minox, using the clockwork timer shutter release to minimize shake. This would create a negative where 1mm equals approximately 1 inch. The Field of View of the microscope is about 1mm round, thus a 1 inch circle in the center of the page should be easily viewable through the microscope. By inverting the microscope and using the binocular attachment, I hoped to reduce this image further to 0.01mm.
The microscope would at minimum allow for viewing, and with the binocular attachment in a conventional configuration, the image should be enlargeable enough to scan with my film scanner. If this worked reasonably well, I should get readable information on a negative that would be virtually undetectable.
FIRST ATTEMPT
Not a complete failure, though it may seem that way. The first step was to create a test page. I have posted the PDF file here for you to download:
 Microdot Test Page PDF
I used my copystand and Minox B to photograph this page, repeating several times at varying speed settings. The film was Kodak 2484 B&W (800 ASA). I also tested if the binocular attachment would work with a microscope by placing the text circle in all caps with a ‘2’ on the line ‘THIS IS A 2 PT FONT’ in the holder, focusing, and clamping the binocular adapter on. I set the camera focus to infinity and took several pictures at varying speeds with the microscope light on.
The results were mixed. The film appeared slightly fogged, likely after exposure, as the notch clipped to show an unused roll was shadowed multiple times. There was also very poor contrast. Critics were right: 800 ASA film is a poor choice for document copying due to huge grain.
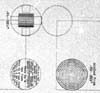
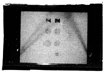 First scan
This first scan shows that, even after extensive correction, poor contrast and grain destroyed extremely fine details.
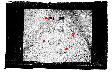 Second scan
With further editing and a lot of contrast filter, I got a bit more definition, though still unacceptable. I was interested in the remaining detail in the greyscale windmill and shocked that the lines came out despite the problems. The diagonal rays are shadows from the copy stand’s legs, left for testing purposes.
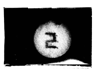 Binocular adapter test
The binocular adapter test was more successful. The ‘2’ was well magnified, suggesting that, without film issues, this could enlarge a microdot to a scannable size. The concept of microphotography with the binocular adapter was proven in theory.
I ordered an additional microscope base to modify for reverse imaging (large image reduction), but film and grain issues need addressing first. Conclusions from the first attempt:
- The film choice (800 ASA) was poor; I’ll try ASA 25 Kodak Techpan (pre-slit from Goat Hill Photo) or microfilm stock.
- The concept has merit with better film and controlled circumstances.
- The binocular attachment performed well, producing clear images despite focusing challenges.
- Lighting is critical; available light on the floor was inadequate.
- I’ll use my developing tank to develop B&W film myself, as lab issues contributed to problems.
Even in failure, I accomplished much, with specific, attainable solutions for the next attempt. (Wonko, 12/1/2000)
SECOND ATTEMPT
This was much better. My strategy changed dramatically:
- Changed from Kodak 2484 (ASA 800) to Agfa APX 25 (from Goathill Photo).
- Increased light using the kitchen’s white linoleum floor with all lights on.
- Developed film myself using Kodak HC-110 (1:31 solution, 6 minutes at 20°C, agitating for the first minute and 15-25 seconds every minute thereafter).
The grain was a major issue before, so I chose ultra-fine grain film. Increased light and exposure time were necessary due to the new film. Developing B&W film myself was new, using resources from The Sub Club’s Darkroom Page, Godfrey DiGiorgi’s Agfapan processing, developing tank guides, Agfa, and Kodak.
I loaded a 15-shot segment and shot a test roll using the test sheet. The results were amazing compared to the initial tests. Lines and circles were clear in the microscope, and I could read the 7 and 6 point lines, suggesting potential for 5 or 4 point lines with better technique and a better microscope.
The one-inch circle translated to about 3/4 of the microscope’s 1mm field of view, indicating the type was reproduced smaller than predicted, likely due to borders in the negatives. This means larger fonts achieved the same results.
Below are scans, noting my scanner’s limitations in reproducing film detail:
 Scan at 1/10th of a second
The lines are clear and distinct, a significant improvement over the original scan.
 Detail of co-centric circles and bars
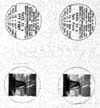 Detail of text and greyscale
Despite excessive agitation, the windmills looked surprisingly nice, with the B&W windmill appearing better than the original. In summary, reducing text to microdot size with a Minox is readily achievable.
Next experiments will involve using the microscope to enlarge text for scanning. Expect more experimentation in this genre in the coming weeks! (Wonko, 12/8/2000)